Stick around if you wonder why second print attempts seem to adhere to the bed better than when you just drop the file on the printer and tell it to go....
It is a fact that if you set your print bed heater to something higher than room temperature, the top surface of any sheet you put on top of it will be cooler by some amount. It also takes time for the temperature on the top surface to stabilize versus the heater; i.e., the heater reaches its setpoint before the top surface of the print sheet reaches some equilibrium and stops getting warmer. You may need to increase your print bed temperature as well as wait for the bed to finish warming up. That is just the way heat transfer works.
Thicker sheets are slower to stabilize and will have a higher differential (lower surface temperature). Steel conducts heat faster than glass. Glass will have a higher differential than steel of the same thickness. Thick glass is notably slower and cooler than thin steel.
Below are thermal pictures of a Makerfarm with a 4mm Creality glass sheet, and a Prusa with a stock spring steel sheet. Both start at room temperature. Both are set to 60C but are not near that temperature when the printer thinks it is (in less than a minute). Both stabilize at lower temperatures.
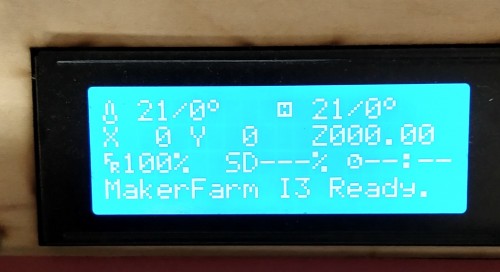
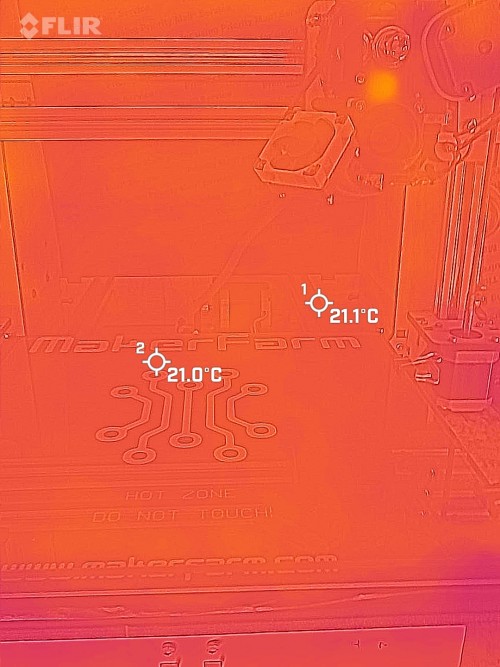
Makerfarm initially.
Immediately after reaching setpoint.

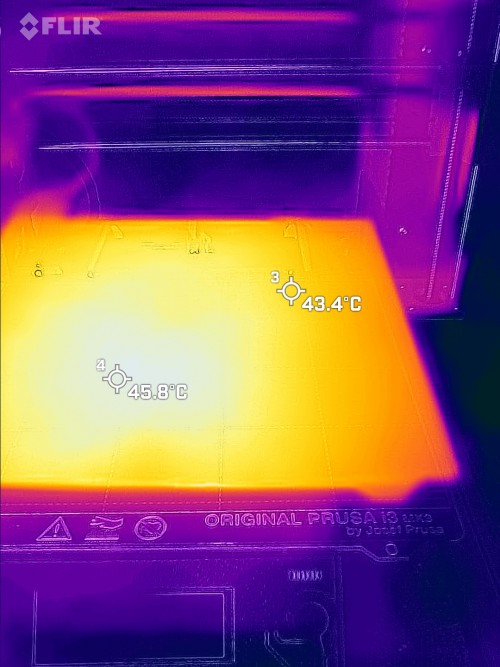
Makerfarm stabilized after about 8 minutes.

Here is the Prusa initially.


Immediately after reaching setpoint.
Prusa stabilized, ~5 minutes

Checking with an IR thermometer in object mode, the bed temperature appears about 4 degrees higher, but still not 60C. This was the case on the new Prusa steel bed and the Makerfarm glass bed. The IR camera matches the printers at room temperature and reads ice at 0C as well. Boiling water was a little tricky, having to look down the side of the pan and trying to stay away from the vapor, but it was right about 99C.
I found getting perpendicular to the bed got me that 4C on the camera. So that puts the Prusa at 56C and the Makerfarm at about 45C, stabilized. Not bad for the Prusa steel bed, but something to think about on a Creality glass bed, coated or not. Matterhackers Ryno asks for 60C, I set the Makerfarm to 75C for good adhesion on plain glass.

It is a fact that if you set your print bed heater to something higher than room temperature, the top surface of any sheet you put on top of it will be cooler by some amount. It also takes time for the temperature on the top surface to stabilize versus the heater; i.e., the heater reaches its setpoint before the top surface of the print sheet reaches some equilibrium and stops getting warmer. You may need to increase your print bed temperature as well as wait for the bed to finish warming up. That is just the way heat transfer works.
Thicker sheets are slower to stabilize and will have a higher differential (lower surface temperature). Steel conducts heat faster than glass. Glass will have a higher differential than steel of the same thickness. Thick glass is notably slower and cooler than thin steel.
Below are thermal pictures of a Makerfarm with a 4mm Creality glass sheet, and a Prusa with a stock spring steel sheet. Both start at room temperature. Both are set to 60C but are not near that temperature when the printer thinks it is (in less than a minute). Both stabilize at lower temperatures.
Makerfarm initially.
Immediately after reaching setpoint.
Makerfarm stabilized after about 8 minutes.
Here is the Prusa initially.
Immediately after reaching setpoint.
Prusa stabilized, ~5 minutes
Checking with an IR thermometer in object mode, the bed temperature appears about 4 degrees higher, but still not 60C. This was the case on the new Prusa steel bed and the Makerfarm glass bed. The IR camera matches the printers at room temperature and reads ice at 0C as well. Boiling water was a little tricky, having to look down the side of the pan and trying to stay away from the vapor, but it was right about 99C.
I found getting perpendicular to the bed got me that 4C on the camera. So that puts the Prusa at 56C and the Makerfarm at about 45C, stabilized. Not bad for the Prusa steel bed, but something to think about on a Creality glass bed, coated or not. Matterhackers Ryno asks for 60C, I set the Makerfarm to 75C for good adhesion on plain glass.
Comment