This is one of those "I've got good news and bad news" stories.
If you've ever owned a pneumag, you know that one of their quirks is the different things you have to do to remove the valve. Usually after degasing a normal Automag, you can pull the trigger to move the sear and the on/off pin, thereby releasing the valve for maintenance. With pneumags, however, there's no direct connection between the trigger and on/off pin. So, the pneumag frame needs to have an extra hole drilled in it near the valve screw. Then you can use an Allen key to poke up through that hole and move the sear.
How annoying.
But, I've finally figured out a work-around: a miniature check valve.
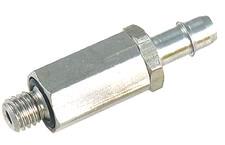
This is the only photo on the website, but there are lots of different configurations to choose from. I bought one with two barb fittings, one on each end. I then added the check valve to my pneumag plumbing between the LPR and the MSV-2.

Yeah. This thing is super tiny. But, it does exactly what I was hoping it would do. That's the good news. Since it's a check valve, it only allows air flow one way (and the air flow direction is stamped on the valve). This means that when I degas the pneumag, the air between the check valve and the MSV-2 isn't released, and I can then pull the trigger one last time and use up that last bit of air to move the piston, tip the sear, and push in the on/off pin to release the valve. All without an Allen key or an extra hole in my frame.
I honestly wasn't sure that this would work since there's not a lot of air volume between the check valve and the MSV-2, but luckily with no gas in the Automag valve, there really isn't any pressure it needs to overcome. So it works great.
The bad news, however, is that these tiny check valves aren't cheap. Plus the manufacturer has a $50 minimum order and about $25 of shipping charges. So two of these valves cost me about $84. Ouch. But it does solve the most annoying issue about pneumags (in my opinion), so it's worth it to me.
Edit:
I should add that if you want to get one for yourself, you need to make an account and fiddle with the configuration. I choose a barb-to-bard model for 1/16" ID hose made from stainless steel (you can't get the cheaper brass option with barb fittings) with silicone o-rings and standard cleaning and lubrication.
If you've ever owned a pneumag, you know that one of their quirks is the different things you have to do to remove the valve. Usually after degasing a normal Automag, you can pull the trigger to move the sear and the on/off pin, thereby releasing the valve for maintenance. With pneumags, however, there's no direct connection between the trigger and on/off pin. So, the pneumag frame needs to have an extra hole drilled in it near the valve screw. Then you can use an Allen key to poke up through that hole and move the sear.
How annoying.
But, I've finally figured out a work-around: a miniature check valve.
This is the only photo on the website, but there are lots of different configurations to choose from. I bought one with two barb fittings, one on each end. I then added the check valve to my pneumag plumbing between the LPR and the MSV-2.
Yeah. This thing is super tiny. But, it does exactly what I was hoping it would do. That's the good news. Since it's a check valve, it only allows air flow one way (and the air flow direction is stamped on the valve). This means that when I degas the pneumag, the air between the check valve and the MSV-2 isn't released, and I can then pull the trigger one last time and use up that last bit of air to move the piston, tip the sear, and push in the on/off pin to release the valve. All without an Allen key or an extra hole in my frame.
I honestly wasn't sure that this would work since there's not a lot of air volume between the check valve and the MSV-2, but luckily with no gas in the Automag valve, there really isn't any pressure it needs to overcome. So it works great.
The bad news, however, is that these tiny check valves aren't cheap. Plus the manufacturer has a $50 minimum order and about $25 of shipping charges. So two of these valves cost me about $84. Ouch. But it does solve the most annoying issue about pneumags (in my opinion), so it's worth it to me.
Edit:
I should add that if you want to get one for yourself, you need to make an account and fiddle with the configuration. I choose a barb-to-bard model for 1/16" ID hose made from stainless steel (you can't get the cheaper brass option with barb fittings) with silicone o-rings and standard cleaning and lubrication.
.jpg)
Comment