instagram takipci satin al - instagram takipci satin al mobil odeme - takipci satin al

bahis siteleri - deneme bonusu - casino siteleri

bahis siteleri - kacak bahis - canli bahis

goldenbahis - makrobet - cepbahis

cratosslot - cratosslot giris - cratosslot

Announcement

Collapse
No announcement yet.

XEMON's phantom double sided feed (3D printed) - Info, how-to and Q&A

Collapse
X
 
  • Filter
  • Time
  • Show
Clear All
new posts

    XEMON's phantom double sided feed (3D printed) - Info, how-to and Q&A

    Hello MCB,

    I have been working on a feed for my phantom and I'm happy to report it finally ready!
    This feed is similar to the one made by apoc4lypse; It works exactly in the same manner. So credit where credit is due.

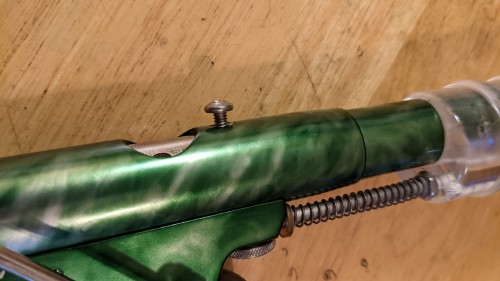
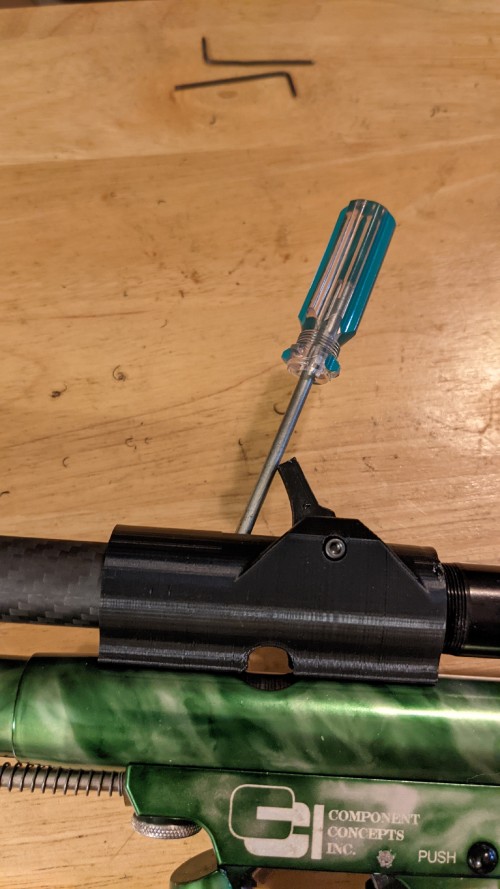
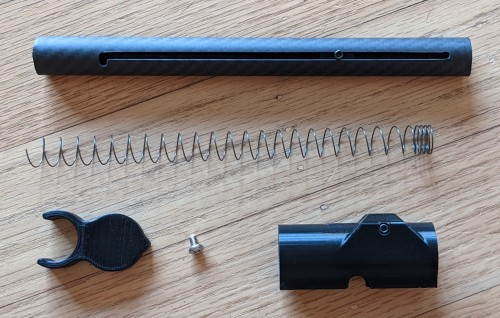
    The feed block has a tapered back in which the stock CCI feed tube screws in perfectly, or you can use it as a cram'n'jam ... up to you.
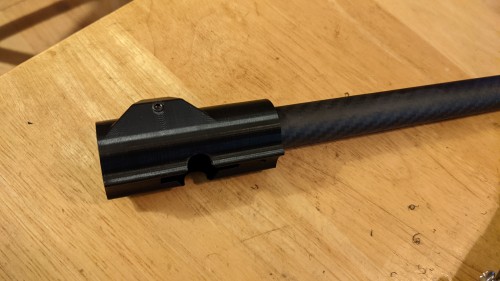
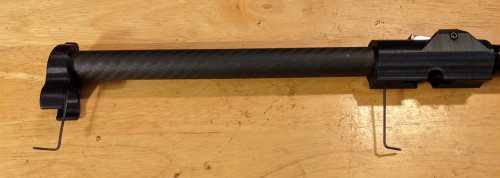
    On the front, there is 2 options, CCI feed tube, or carbon fiber tube (mate or gloss)


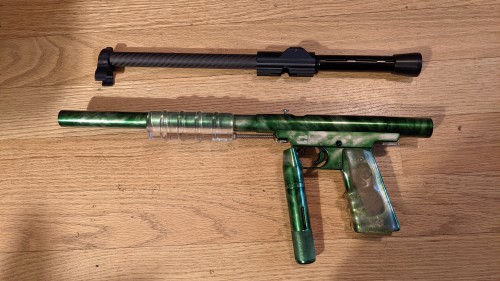
    Here is the Mate Carbon Fiber tube:


    Here is the Gloss Carbon Fiber tube:


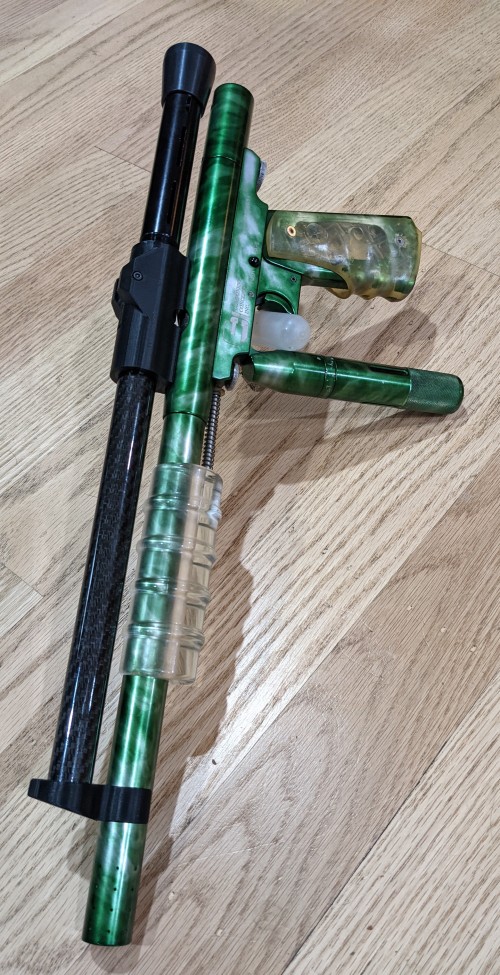
    And here is the Dual CCI-CCI:
    I recommend to use 15rd CCI tubes, they hold 13 rounds up front and clear the pump handle.


    2 side by side:


    there are some information and early prototype pictures here: interest thread
    Where Carp had some good questions. Feel free to ask any questions you have, I will do my best to answer them quickly.
    Originally posted by XEMON View Post
    Q&A part 1
    The feed went through a destructive test, here are the details:
    Originally posted by XEMON View Post
    "destructive strength test"
    There is a few things I'm still working on this project. These are not guaranteed or exclusive (if there is request I may add a few things). And I don't have any timeline for any of them.
    - Making a spring feed version Done!
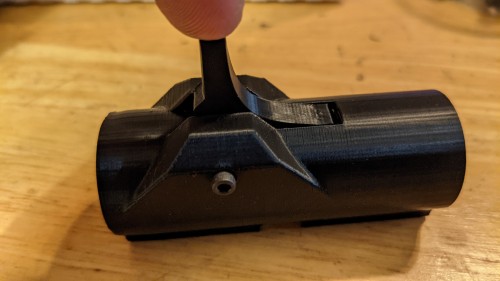
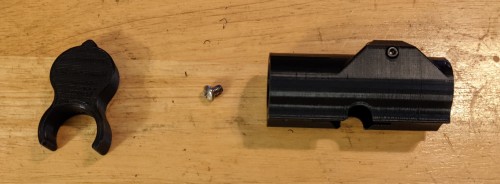
    - Making it easier to tighten the mounting screw Done!
    - Clear tube?
    - Make a Sheridan version
    - Make a pro-___ version (just about done!)
    - Make my own spring (a bit softer/gentler)
    ​​​​​​-
    Make a dual phantom version (a la Phoenix/Deuce) -> nearly done!
    - ...

    Revisions/versions:
    - Gen1:
    This is the firs version, it works, but tend to double feed when fully loaded.
    - Gen1.5:
    This is a Gen1 with a "retrofit kit" to bring them to Gen2 spec. -> Ill make the kit once i finalize Gen2 (stay tuned)
    - Gen2:
    This is the revised version, same principle, but with a slightly longer tube to allow for more space when the spring is fully compressed. I also re-designed the gate to have a better geometry.
    This version is still now complete and is the only one sold new.

    This thread is still in construction for a bit, make sure to come back get all the latest news
    Last edited by XEMON; 10-13-2023, 01:37 PM.
    Love my brass ... Love my SSR ... Hard choices ...

    XEMON's phantom double sided feed
    Keep your ATS going: Project rATS 2.0
    My Feedback

    #2
    This is as close to a user guide/manual as I'm probably capable of doing.
    As always, feel free to reach out if you have any questions.


    Assembly and mounting guide:
    Liability disclaimer: I am not responsible for any damages to the marker or any equipment.
    Use proper PPE and tools. If you are not confortable putting this together, dont!


    Step 1:
    Put the mounting screw on the body, just a few threads are enough:


    Step 2:
    Put the front tube into the front of the body.
    If you are mounting the CCI front tube version, screw in the tube. Do not overtighten it, it could crack the feed block.


    Step 3:
    Put the barrel clamp on the tube and line up the barrel clamp and the feed block.
    Now is a good time to install the rear CCI tube if you want. Do not overtighten it, it could crack the feed block.


    Step 4:
    Once lined up, use the set screw to hold the tube in place.
    Do not overtighten as this could crack the carbon fiber tube.
    The setscrew are metal tipped, they can scratch the anodizing on the aluminium tubing, beware!


    Step 5:
    Put it on the gun.


    Step 6:
    Tighten the mounting screw.
    If you are using a small screw driver, it can be inserted with the gate in place.
    If the screw driver does not fit, the gate will have to be removed.
    Edit: The window on top is now a bit bigger for better/easier access to the mounting screw. Do not over-tighten the mounting screw as it can damage the feed block.


    Gate removal guide:

    Step 1:
    Loosen the pivot screw. They do not need to come all the way out, just a bit to release the gate.


    Step 2:
    The gate is now loose, it will fall out.


    Step 3:
    To put the gate back on, lay it in the open position on the notch and tighten the pivot screws.


    Congratulation! your phantom is ready for the field.

    Last edited by XEMON; 08-28-2021, 08:11 PM.
    Love my brass ... Love my SSR ... Hard choices ...

    XEMON's phantom double sided feed
    Keep your ATS going: Project rATS 2.0
    My Feedback

    Comment


      #3
      Release of liability (added 08/17/2021):
      I am not expecting any issue, but let me say this for good measure:
      I am not responsible for any injury occurred by any part of the kit (during assembly or otherwise).
      I am not responsible for any damages you do to your marker (during assembly or otherwise).
      I am not responsible for any damages you do to the kit (during assembly or otherwise).
      Some kits come with carbon fiber components; carbon fiber can have some fiber sticking out. Those fibers are very thin and can easily cause splinter. I do my best to get them out, but there may be some residual fiber left. I am not responsible for any injury caused by the carbon fiber.
      By purchasing any of the kits, you agree to those conditions. If you dont agree with them, dont buy it.
      Note to anyone who purchased a kit before 08/17/2021: If you do not agree to the above conditions, i will issue a full refund and return label for the kit.

      What is in the "kit":

      Here is what comes with the CCI - CCI feed:
      - Feed block already assembled
      - Barrel clamp
      - Mounting screw
      Please note there is no CCI aluminium tube included, you will have to provide your own.
      Edit: Due to the low demand for this kit, it is now offered as Print on Demand ONLY.


      Here is what comes with the CCI - CF feed:
      - Feed block already assembled
      - Barrel clamp
      - Mounting screw
      - Carbon Fiber tube
      Please note there is no CCI aluminium tube included, you will have to provide your own (optional).


      Here is what comes with the CCI - CF Spring feed:
      - Feed block already assembled
      - Slotted Carbon Fiber tube
      - Follower already installed in the Carbon Fiber tube
      - Spring cut to length
      - Barrel clamp
      - Mounting screw
      Please note there is no CCI aluminium tube included, you will have to provide your own (optional).

      As with any spring feed system, there is an increase risk of double feed and paint chop at the bolt.


      Shipping note:

      the mounting screw is a paper/bag inside the feed block:
      Last edited by XEMON; 08-28-2021, 09:23 PM.
      Love my brass ... Love my SSR ... Hard choices ...

      XEMON's phantom double sided feed
      Keep your ATS going: Project rATS 2.0
      My Feedback

      Comment


        #4
        Ohhhh yea!

        Comment


          #5
          question does this mod make not stock class any more but more open class since can only have one stick feed

          Comment


          • XEMON

            XEMON

            commented
            Editing a comment
            If you are using a rear tube, it does not.
            The CCI front tube hod 13 rounds and the carbon fiber front tube hold 15. If you add a rear tube, you are going to exceed the 20 rounds max.
            If you really want both front and back, we can shorten the front tube (under cocking kit will be necessary) or install a plug inside.

          • Grendel

            Grendel

            commented
            Editing a comment
            I plan on just making a plug I can drop down the front tube and lock into place with a pin to make sure I can still use in Stock Class only games (think a duck plug for a shotgun). So I would be able to keep the original length and use it for both Stock and modified stock.

          • The Great Equalizer
            The Great Equalizer commented
            Editing a comment
            When Apoc4lypse made mine I asked about this and he sent a slightly longer set screw for the spring plug. I could tighten it through the plug to press on the inside of the feed tube (aluminum) to stop the plug wherever I wanted. I did this at a Slim's Stock Class event a few years ago so I was compliant

          #6
          It’s still horizontal feed and rock and cock. So as long as you don’t put more then 20 round (2 tubes) in it. It would be compliant for the 2.0 rules. I’m sure it could be shortened up to hold only 20 pretty easy. Nobody is going to give you a hard time. It’s not like it’s spring fed. I imagine it’s like the AT rule just don’t use it.

          You could always just take the back feed tube off and use the feed block as a rock back cram and jam. Front holds 13 from what I understand. (If it was ever an issue)

          These definitely would be compliant. You can just add the extra feed when your not playing SC specific rules.
          Attached Files

          Comment


          • XEMON

            XEMON

            commented
            Editing a comment
            If you dont use a rear tube, youre good. The carbon fiber tube holds 15 rounds.

          #7
          First prototype of the spring feed.
          solved some issue, and found a few other 😅
          Next attempt should let me know if it may come soon or it's gonna be a while ...

          Click image for larger version

Name:	PXL_20210724_212103759.jpg
Views:	2051
Size:	3.11 MB
ID:	154436
          Love my brass ... Love my SSR ... Hard choices ...

          XEMON's phantom double sided feed
          Keep your ATS going: Project rATS 2.0
          My Feedback

          Comment


          • Chuck E Ducky

            Chuck E Ducky

            commented
            Editing a comment
            Oh I might wait for a spring feed version that’s cool

          • NONOBLITUS

            NONOBLITUS

            commented
            Editing a comment
            I have spring feed money burning a hole in my pocket.

          • XEMON

            XEMON

            commented
            Editing a comment
            P0 (above) works, but I don't think it will hold up very well.
            I'm hoping to find time to work on P1 today, otherwise it's gonna have to wait a few weeks ... But I'm getting there, just hold on a bit longer ...

          #8
          Originally posted by XEMON View Post
          Next attempt should let me know if it may come soon or it's gonna be a while ...
          Ok, managed to make P1 today, solved a lot of the issue I found with P0.
          Now i need to get the proper tooling, it should speed up the process a bit.
          still need to find a way to clean up teh cut ... got a nasty carbon fiber splinter ...

          Edit:
          No picture because it looks the same from the outside :P
          Love my brass ... Love my SSR ... Hard choices ...

          XEMON's phantom double sided feed
          Keep your ATS going: Project rATS 2.0
          My Feedback

          Comment


            #9
            So here is mine mounted on one of my setups….

            This is a Roundhead body, dual Rod UC kit, with 5” Freak Front and a Doc’s Flashpoint tip with ICD lever changer and Gargoyle Frame….after seeing it in writing, there isn’t much phantom left in this one

            Click image for larger version

Name:	image_17280.jpg
Views:	2083
Size:	6.18 MB
ID:	155046

            The carbon fiber tube was too long (obviously) for this set up so I took about 2.5” off of it. It is now the correct length and the standard CCI barrel clamp Xemon printed for them fits perfectly on Doc’s tip. Hold on to the barrel very securely and is nice and thick. There definitely won’t be clearance issues with the UC kit.

            With the CF tube cut down and the 10 round CCI feed tube this lets me hold 19 rounds……perfect!

            First thoughts:
            This is stout and well designed. It feels heavier then the APOC version (May be my imagination), tolerances are great….the CF tube fits very snug, I didn’t even need to use the set screws.
            Feed gate works flawlessly without any need of fitment or sanding— granted I’ve only played with it in the kitchen. Can’t want to get to the field an put it through it’s paces.
            JeepDVLZ45's Feedback

            💀 Team Ragnastock 💀

            Comment


            • XEMON

              XEMON

              commented
              Editing a comment
              First one in the wild and you took it right out of the park. Looks fantastic!

              Thanks for sharing your first thought, let us know how it works out in game.

            #10
            Alright….got my second setup done today and played with it a bit in the backyard. If I set one of my markers up with a springpheed this one would be it.

            Basic phantom, nothing special going on with it. I love the anno and wood grips (came to me this way). All I did was add some brassy goodness. This is my modified SC set up and my original dualpheed marker.

            Click image for larger version

Name:	DDDBE8DE-DF01-4CB2-922E-F558CFADBE0A.jpeg
Views:	1930
Size:	5.52 MB
ID:	155562 Click image for larger version

Name:	4CCFD62E-DA04-4ED4-B45A-D80F9E8DE1B9.jpeg
Views:	1935
Size:	4.35 MB
ID:	155563
            I was a little hesitant about going with a “cram and jam” for my “rear tube” as I really liked the original APOC design, but I LOVE it! It’s a lot of fun to shoot with this setup. No problems with it feeding this way great the new block holds the cigar tubes in securely. I wouldn’t be afraid to loosing it on a break or

            I did learn that you can thread the CCI tube in a lot farther then I had thought so I got a few extra threads in on my other setup.

            As for calacity, I get 13 rounds in the front tube and then then 10 from my cigar tube in the rear.

            The only “issue” I’ve had so far was the feed block “twisting” a bit when I would cram in another 10-er. I tightened the mounting screw up a bit and it took care of the problem…chalking that one up to operator error.

            I’d also like to reiterate that the barrel clamp is AMAZING! That was the 1 thing I thought needed the most improvement from my APOC setup and XEMON knocked of out of the park!. It holds everything very securely, there is enough room for a UC kit (dual or an old WEVO style like this on) and you are still able to unthread the barrel easily to replace detents/freak backs if needed.

            I’m pretty impressed with this first iteration!
            Attached Files
            JeepDVLZ45's Feedback

            💀 Team Ragnastock 💀

            Comment


            • Menso

              Menso

              commented
              Editing a comment
              I see you’ve got the smoke 10rd tube in these pictures, but how securely does it hold the clear tubes? The smoke and clear tubes I have definitely aren’t the same thickness.

            • JeepDVLZ45

              JeepDVLZ45

              commented
              Editing a comment
              I don’t have any clear tubes to test only the smoke. If you want to send me one, I can let you know. 😁

            • XEMON

              XEMON

              commented
              Editing a comment
              They fit well in there.
              The back of the block is tapered (it's very similar to the taper in the stock CCI feed).
              So the CCI feed can screw in there or you can jam a 10 round tube in there.
              I tried most of my tube and only a few didn't held as well. I can take some pictures of which fit and which don't fit too well if interested.

            #11
            I finally had time tonight to sit down and install Xemon's double feed kit. It looks super sexy!!! Thanks for breathing some new life into this old girl for me. Click image for larger version

Name:	20210804_201613.jpg
Views:	1941
Size:	4.65 MB
ID:	157755

            Comment


              #12
              any thing over 15 rounds is open class

              Comment


                #13
                I rocked mine a couple weeks ago and the mounting screw came unthreaded. Not a fault of the feed, I didn't have the right sized screwdriver to tighten it down fully. I was using a Lapco barrel and undercocking kit and the ring fits snugly over the fat 'bump' on the barrel, but was loose on the thinner portion. The feed worked well, but since I'm more used to standard SC feed it took some getting used to. I like it, but I need to mess with it a bit to get it just right.
                💀 PK x Ragnastock 💀

                Comment


                • XEMON

                  XEMON

                  commented
                  Editing a comment
                  It is a little hard to get to the screw.
                  I have done it this way to avoid a hole through the top, but maybe it would be better?
                  Thanks for the feedback, it is one of the things that I wish to improve.

                • Jonnydread

                  Jonnydread

                  commented
                  Editing a comment
                  XEMON Sure thing man. Unless you think a hole would affect the integrity significantly I think that would be a good idea. All of my screwdrivers were either too big or too little to grip from that angle, even with the trap door removed.

                • XEMON

                  XEMON

                  commented
                  Editing a comment
                  I had a middle of the road idea: By rounding outward the top slot (and extending the gate a bit) this gives a bit more clearance.
                  I will test it out and see how it goes, but its not going to be ready for the next batch ...

                #14
                Started printing the next batch with my new Pi ... and dabling into video ...

                Love my brass ... Love my SSR ... Hard choices ...

                XEMON's phantom double sided feed
                Keep your ATS going: Project rATS 2.0
                My Feedback

                Comment


                  #15
                  Mate tubes are due in early next month and the glass are due next week.
                  So the next batch might be a small batch of gloss, then a larger mixed once i get all the tube in.

                  Out of curiosity, would people prefer gloss or mate tube?
                  Love my brass ... Love my SSR ... Hard choices ...

                  XEMON's phantom double sided feed
                  Keep your ATS going: Project rATS 2.0
                  My Feedback

                  Comment

                  Working...
                  X