instagram takipci satin al - instagram takipci satin al mobil odeme - takipci satin al

bahis siteleri - deneme bonusu - casino siteleri

bahis siteleri - kacak bahis - canli bahis

goldenbahis - makrobet - cepbahis

cratosslot - cratosslot giris - cratosslot

Announcement

Collapse
No announcement yet.

What did you 3D print today?

Collapse
X
 
  • Filter
  • Time
  • Show
Clear All
new posts

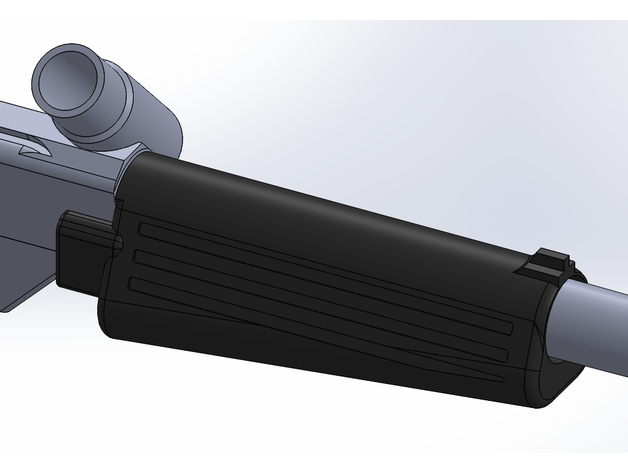
    Printed a Magpul MOE wanna-be for my 468. Feels great. Print shifted up around the beaver tail, and I'm not really sure why, but I can't feel it, so I'm leaving it. PLA+ has been printing very well for me lately, and it's much less brittle than the carbon fiber PLA I was playing with before. It's so shiny though. I might experiment with high grit Emery cloth to dull it.
    Attached Files
    Feedback

    Comment


    • JonM

      JonM

      commented
      Editing a comment
      I've had success using Plasti Dip spray on printed grips.

    • Brokeass_baller

      Brokeass_baller

      commented
      Editing a comment
      I like the texture on it though. I think Plasti-Dip would dull the texture.

    Finally got a part off my printer. Icd cat foregrip, not my design. It was on thingiverse. It makes a cat so comfy and can be used on other shooters like pro carbs.

    it's not great, but I'll take it. Inland petg .2 layer height, no cooling. My duct kept snagging the print so I pulled the ducts and printed this. I think the lack of minor cooling caused the zitty over hangs, but they honestly add grip so it's no biggie. My friend made me the same handle on his creality K1. And it's much nicer.

    Foregrip for any of the Indian Creek Design "Cat" paintball guns (Thunder Cat, Alley Cat, Bobcat, Puma). Modeled after the Tippmann “Pro” series foregrip (Pro/Carbine, Pro-Lite, Pro-Am, F/A). It clamps to the 1" OD section of the upper receiver. Requires 10-32 x 1/2" socket head cap screws and 10-32 nuts, 2 each. I suggest printing with a raft for bed adhesion. The clamp piece should be printed with a relatively high infill density. The foregrip can be done with a medium infill density.


    Printing a new lower profile duct for my MAD now out of the same material. Hoping it doesn't clip prints. Then I'll print the clamp shoe for this grip.
    https://www.mcarterbrown.com/forum/b...khaus-feedback

    Comment


    • BrickHaus

      BrickHaus

      commented
      Editing a comment
      This fit tight on my cat, and forcing it on cracked it to death... ugh,9 ours gone. I dunno what my issue is, but I'll spend speckled parts of my free time trying to get it working.

      I'm about ready to scrap both of my printers and buy a more modern one. My buddy bought a creality K1, and he is printing 10x faster than me with 100x less issues out of the box. I've struggled to print anything at 30mm/s since day one, and I've tossed upgrades at these things the whole time.

    • Jackson

      Jackson

      commented
      Editing a comment
      That's my Thingiverse profile. Sorry it ended up too tight. I can make adjustments and upload a new version for you if you want it.

    • BrickHaus

      BrickHaus

      commented
      Editing a comment
      No worries! It was tight because my printer over extruded due to bad retraction settings. My friend printed me the same grip on a creality K1, and it's perfect. I want to print one out of wood pla and sand/stain it.

    Found a remixed duct for my aftermarket printer head assembly. It gives much more clearance from my print. Printing the clamping block for the above grip now with better part cooling.
    https://www.mcarterbrown.com/forum/b...khaus-feedback

    Comment


    • XEMON

      XEMON

      commented
      Editing a comment
      I've had very good results with the HeroMe
      I'm not sure what rev they're on now ...

    • BrickHaus

      BrickHaus

      commented
      Editing a comment
      I have a hero me on my other printer.it has served me well. Not sure it works with the Biqu H2 extruder I have on this one. All in all, I like the MAD better. It does require heat inserts, but it's a lot easier to assemble than my hero me.

    Not today but in the last week… testing out the new printer. The Bambu Lab A1 Mini with AMS Lite.

    Click image for larger version

Name:	IMG_9129.jpg
Views:	346
Size:	2.69 MB
ID:	473400
    Click image for larger version

Name:	IMG_9121.jpg
Views:	357
Size:	4.56 MB
ID:	473401
    Click image for larger version

Name:	IMG_9133.jpg
Views:	351
Size:	4.25 MB
ID:	473402
    My feedback

    Comment


    • BrickHaus

      BrickHaus

      commented
      Editing a comment
      I've been eyeballing the x1c. Mainly because my ender 3s are making me depressed lol, how is that bambu?

    • pghp8ntballer
      pghp8ntballer commented
      Editing a comment
      Honestly I am fantastically pleased with it. All of those pics are done with no name, chinesium/Amazon cheap filament. I have an FLSun V400, FLSun Super Racer, ender 3 V2, and Voxelab Aquila also. The FlSuns stock print really good… but the Bambu Lab A1 Mini still smokes them in quality. And it prints as fast as the V400. And the AMS Lite works great. And the full Mini/AMS combo was cheaper then I paid for the V400 on a lightning deal (it was $350 off!). My wife wasn’t interested I. Printing anything before. She is now interested and even sliced some stuff herself besides just printing directly from the Bambu App.

      The best way I can describe this is like this; Bambu Lab put in the engineering time from fine tuning the machine with tech, including cost efficiency design, as well as ensuring the profiles are tuned to print great. And I mean that includes many different filament types, .2, .4, .6, .8 nozzle profiles, different beds, etc. The printing experience is wonderful. I haven’t been interested in the big Bambu machines because the beds aren’t big enough for what I want and I didn’t want to spend that much on what seemed like hype.

      I understand the hype now. They are pumping out great machines and I can’t wait to see what else they do.

      It isn’t perfect and still has the normal learning curves like dealing with bed adhesion… but this is dang close to a Cricut machine.

    Finally. Spent some time tightening up bits on both printers.

    The petg printer (left) had a loose gantry. And my retraction had defaulted to a bad setting. It has been so long, I didn't remember what it took to make this head work. .4mm at 5mm/s. Seems wrong, but it's a clean print so far. I'm printing a modified mozak phantom pump handle. I took the design MozakMachine has here on cult 3d, and I moved the pump arm hole to the center below the barrel. It should (maybe?? ) work on my new to me spitfire, and tippmann SL 68s.. maybe another phantom clone with a 10-32 under cocking pump rod... I totally eyeballed it as I had to draw on his mesh file.

    link to his awesome work here. https://cults3d.com/en/3d-model/gadg...chine-products

    Right printer had a dead cooling fan. Luckily I made that one plugged. So I swapped a new one out. I then put a new nozzle in. It was still printing like poo, so I put a new spool of filament into it that was dried to 30%. Printed a nice benchy with a little offset tuning and bumps of the bed springs.

    Now I'm 9 hours into a 20 hour print. It looks good so far.....
    Last edited by BrickHaus; 11-19-2023, 10:02 PM. Reason: Not frame, pump handle.
    https://www.mcarterbrown.com/forum/b...khaus-feedback

    Comment


    • RAZRBAKK

      RAZRBAKK

      commented
      Editing a comment
      Damn these are some nice designs. Let me know how it goes on the Spitfire. My first thought when you said the pump handle was goofed was to swap it for an AirSolder PR6.

    • BrickHaus

      BrickHaus

      commented
      Editing a comment
      Man, that pr6 does look nice.

      As for my pump. The brass insert pushes it too far away from the barrel and it JUST binds at the end of the pump stroke. I might tire plug the hole, and model an m5 printed threaded hole and get it closer to the barrel. I am just making these in petg though. I wish I could churn asa out.

    Trying one with threads now..
    https://www.mcarterbrown.com/forum/b...khaus-feedback

    Comment


    • Myrkul

      Myrkul

      commented
      Editing a comment
      BrickHaus BMC can whip you up a freak XL adapter for those....

    • Brokeass_baller

      Brokeass_baller

      commented
      Editing a comment
      I'm pretty sure a Spyder barrel sans threads will fit. That or an Autococker. I had one that I sanded the threads off on a cheap adapter for. So it was either AC to Spyder, or Slider to AC, and I just filed off the threads.

    • BrickHaus

      BrickHaus

      commented
      Editing a comment
      I took an old brass pps a5 barrels threads down once for a sl68-ii then I just chamfered the breach to match the bolt. It worked great

    New pump handle printed with modled threads. Seems to work, but I'm not sure for how long. Haha.

    This was started as I left for work, so I couldnt babysit and or tune so it's flawed. I'm convinced my petg is still wet after being cooked at 50c for days.


    The wood pla stock my buddy printed for me. I intend on staining it.

    These spitfire 2 guns are quickly growing on me.
    Last edited by BrickHaus; 11-20-2023, 09:01 PM.
    https://www.mcarterbrown.com/forum/b...khaus-feedback

    Comment


    • XEMON

      XEMON

      commented
      Editing a comment
      PetG takes 2 to 3 days in the food dehydrator before stating to see results for a somewhat pull spool thats not too too saturated.
      Those little guys looks good 👍

    • BrickHaus

      BrickHaus

      commented
      Editing a comment
      I had it in my dryer for many days. But it still seems wet. I'll have to invest in a dehydrator later. Or buy better petg. Inland filament is what I almost always use, and it honestly seems to be part of my struggles.

    To date, the most wasted support material I have laid on a bed. 16 hours in and it's almost finished. Mozak stick feed.


    She ain't pretty, but it'll do pig. One day I'll get cleaner prints.
    https://www.mcarterbrown.com/forum/b...khaus-feedback

    Comment


    • Brokeass_baller

      Brokeass_baller

      commented
      Editing a comment
      Why didn't you spin it upsidedown? Would've only needed like 20mm of supports.

    • BrickHaus

      BrickHaus

      commented
      Editing a comment
      I dunno. I feel like I did, but the angle made it seem like a weird bed to lay on.. in hind sight you are right. Lol

    After waiting 16 hours for the mozak feed. I found this feedneck cram jam adapter on thingiverse. I then dug out my sconi feedneck, and printed said collar.. I think it's a winning combination.
    Attached Files
    Last edited by BrickHaus; 11-23-2023, 04:10 PM.
    https://www.mcarterbrown.com/forum/b...khaus-feedback

    Comment


      Click image for larger version  Name:	2023-11-23-14-38-32-136.jpg Views:	0 Size:	3.80 MB ID:	476810
      After 2 weeks of the ender being down for maintenance and trouble shooting, we're back. I put new wheels on all around as mine were definitely showing signs of wear. Also dropped a 0.4 nozzle back in so I could work on some Christmas prints for the wife.

      Vase mode trees printed in transparent petg(god I love this stuff), going to get some led "candles" for these. The moose is from a snap card that we're going to be including with cards and gifts. Printed in PLA.
      Originally posted by Terry A. Davis
      God said 640x480 16 color was a covenant like circumcision.

      Comment


      • goofyman23
        goofyman23 commented
        Editing a comment
        Could I get the STL of those trees?

      Click image for larger version

Name:	IMG_9166.jpg
Views:	274
Size:	3.25 MB
ID:	477004 Wednesday night print: “Piece of Junk in Space” with shadowbox. Not my work at all. I just found it online.


      Click image for larger version  Name:	image0.jpg Views:	0 Size:	1.10 MB ID:	477003
      My feedback

      Comment


        Click image for larger version

Name:	2023-11-25-13-48-29-854.jpg
Views:	279
Size:	3.54 MB
ID:	477483

        Trying out an adapter for CCI seals on this trracer. The one it came with is on its way out.

        I also have some teflon tube and am going to try and make one eventually.
        Originally posted by Terry A. Davis
        God said 640x480 16 color was a covenant like circumcision.

        Comment


          Working on a little something for my pistol mag. It's currently printing in PETG, but if all goes well I may or may not reprint it in wood just like the grips.

          Click image for larger version

Name:	aMEZnQg.jpg
Views:	271
Size:	435.9 KB
ID:	477664Click image for larger version

Name:	Foregrip.jpg
Views:	266
Size:	32.0 KB
ID:	477665
          My Feedback Thread
          3D Printed Marker Upgrades

          Comment


            The foregrip came out really well. I think it actually completes the look too.

            Click image for larger version

Name:	kumMaSil.jpg
Views:	275
Size:	70.5 KB
ID:	478131Click image for larger version

Name:	teDf5mGl.jpg
Views:	253
Size:	47.8 KB
ID:	478132Click image for larger version

Name:	GjPDJ42l.jpg
Views:	246
Size:	40.1 KB
ID:	478133
            My Feedback Thread
            3D Printed Marker Upgrades

            Comment


            • JonM

              JonM

              commented
              Editing a comment
              If you're intending on printing one out for yourself, I think I'm going to make one small tweak to improve tolerances a bit. It's pretty stable right now with only the slightest amount of side to side play (way less than a pump kit), but I think I can make it rock solid with one small change. The new file is up now labeled V2 in the filename.

            • Spider!

              Spider!

              commented
              Editing a comment
              I made one out of wood once. It was lumpy.

              They indeed do look odd if they droop at all.

            • JonM

              JonM

              commented
              Editing a comment
              Thankfully this one doesn't droop. Rather the tolerances in front of the rail allowed for the *slightest* bit of side to side play. Personally, I would probably be fine leaving it alone, but if others are going to start making them for their own Mags, then I wanted it to be perfect. Then again, perfectionist that I am, I probably would have ended up tweaking it anyway.

            Ion XE blade trigger printed with Overture PLA+ @ .2mm layer height with a .4mm nozzle. Might re-do with regular PLA, as I understand that it would be stiffer and bend less. But as is, it's very usable with a mech conversion and I don't see it breaking any time soon.

            (not my file)

            Designed a trigger for the ION. Printed with a 0,25mm nozzle. Sized to fit the magnet from the original trigger. The trigger has no end screw but stops before it puts pressure on the controlboard. The no bearings trigger relies on the pin alone and SHOULD fit TheTrigger Version 6 has a bigger hole to pressfit three (3mm*6mm) bearings into it and sand down the original pin to 3mm diameter (or just use a 3mm Screw and a nut.)
            Attached Files

            Comment

            Working...
            X